Building machine learning models is fun and challenging, but the real challenge can be figuring out how to deploy your models in a production environment. This includes answering questions like: Does the model need to be translated to another programming language? Will it scale? Does it need to be dumbed down? Usually, the person who built the model is not an expert on how to deploy the model in infrastructure, which has led to a proliferation of turn-key solutions for converting machine learning models into web APIs: Azure ML, YHat ScienceOps, Domino Data Lab, and many others. I’m not a big fan of spending money on these types of platforms or systems because they are usually costly and require learning quirks of a specific platform that has limited features and support, so I’ve tinkered with finding alternatives.
A Scalable Infrastructure
AWS Lambda is serverless computing, in other words, you only pay for the computation of a function you’ve uploaded to AWS. AWS will manage the orchestration of servers to handle requests. AWS Lambda functions can easily be turned into a webservice using AWS API Gateway, so this accomplishes your accessibility and scalability requirements. AWS will scale to however many requests come in and you only pay for what you use. The question is: How to execute machine learning models from an AWS Lambda function?
Model Building and Execution using PFA
Models can be built in many languages like, Python, R, or Java and if you work on a large, cross-functional team it might not be possible to agree on using just one language. The Portable Format for Analytics (PFA) is an interesting solution because it is a language-agnostic, plain-text standard for representing analytical workflows. PFA can be executed from within an AWS Lambda function in either a Java or Python runtime using the Hadrian or Titus libraries, respectively (an example is provided below). At a high-level data will be sent via HTTP to API Gateway, which provides scaffolding to route the request to your AWS Lambda function. Once the data reaches the function, the PFA logic will be applied and the result passed back to complete the roundtrip API call. All of this is completely scalable, can be run at low cost, and automatically gives you infrastructure for tracking response times, assigning per-user access keys, creating API documentation, applying request validation and much more. As a bonus, using AWS may also be more likely to get more support from your IT staff should you need it.
Actually Doing This
Step 1 - Creating the Lambda Function
The absolute simplest test would be to clone the repository where I’ve created a Lambda deploy package for running Titus (Python runtime), then zip up that package and upload to the AWS Lambda console.
git clone git@github.com:StevenMMortimer/pfa-lambda.git
zip -r my-lambda-deploy.zip .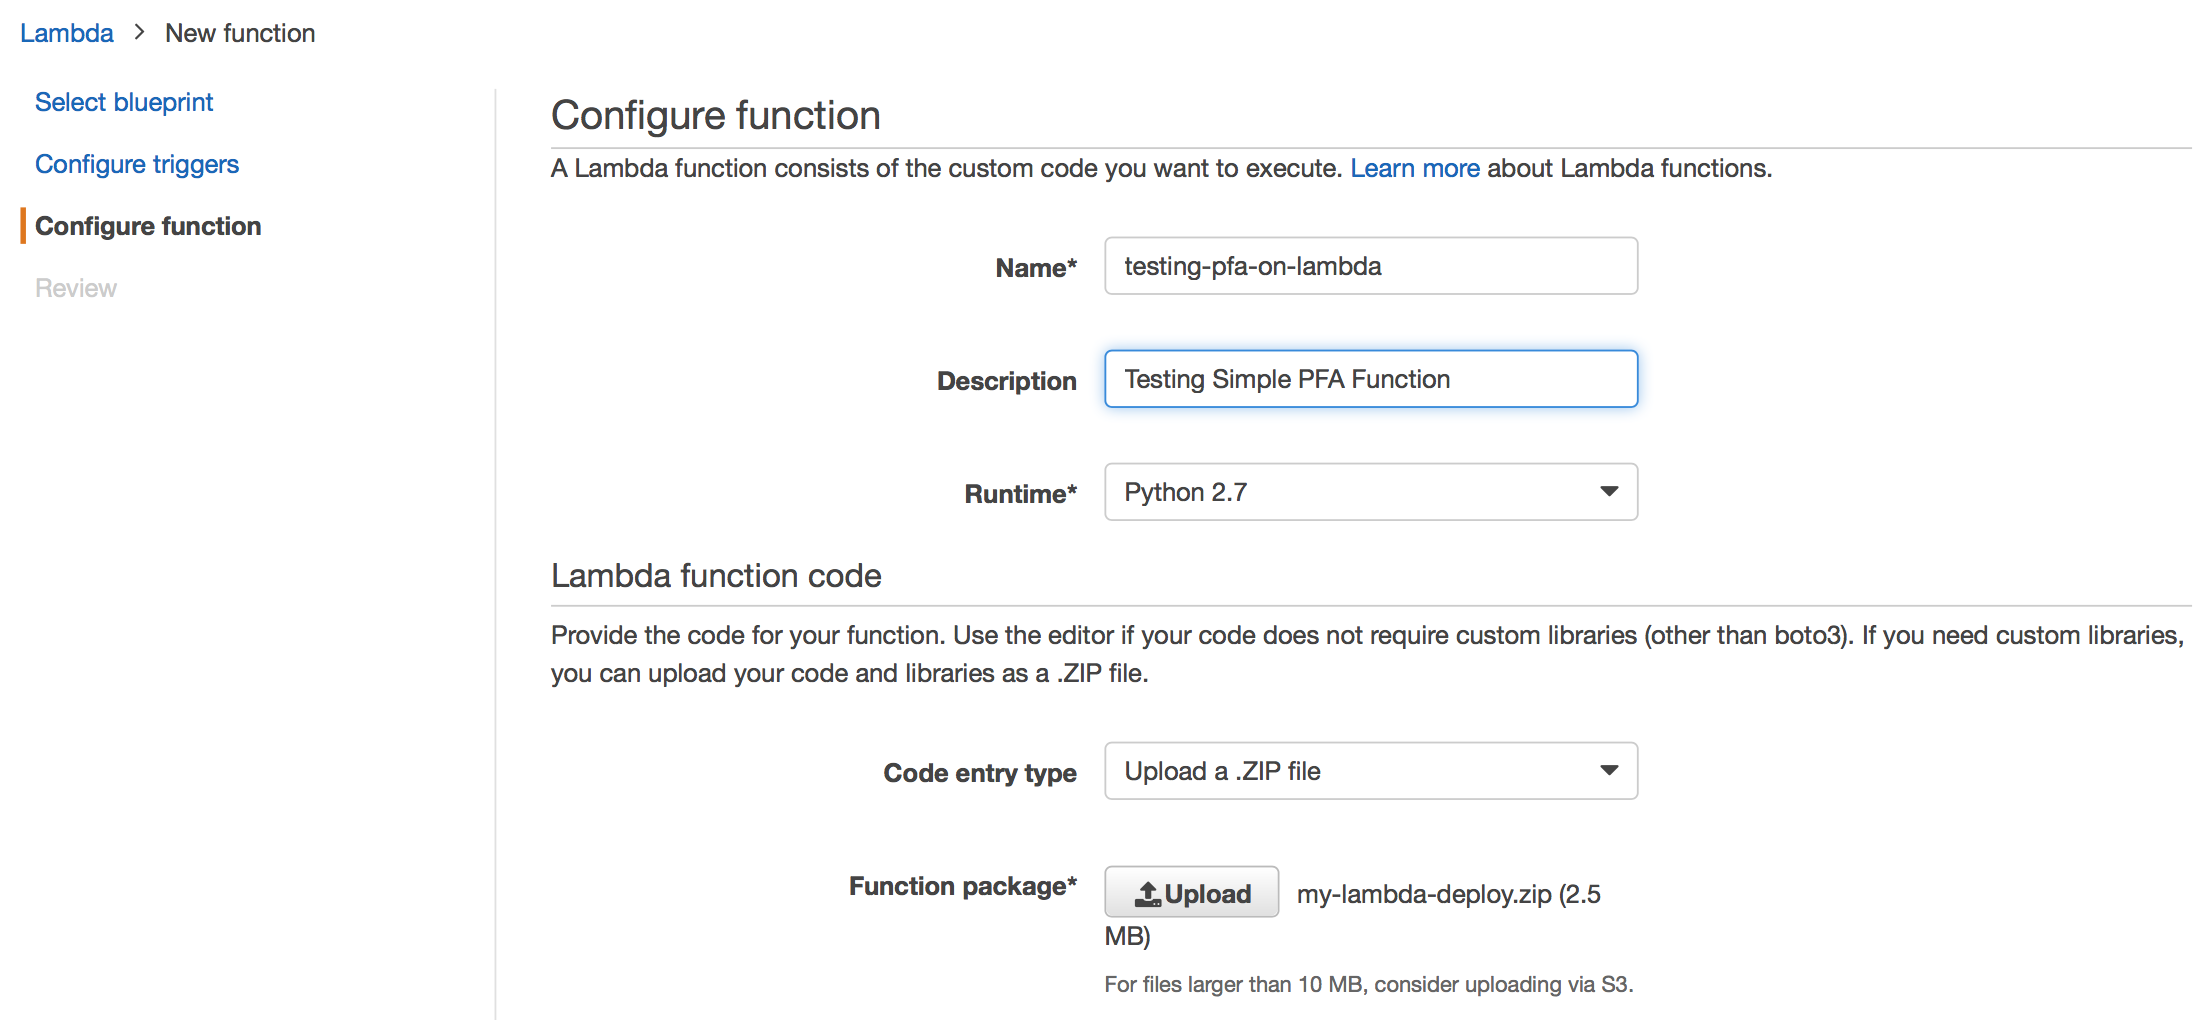
Note, you’ll want to select the Runtime for your lambda as Python 2.7 since that
is the Python version that this lambda deploy package was created. Also, the deploy
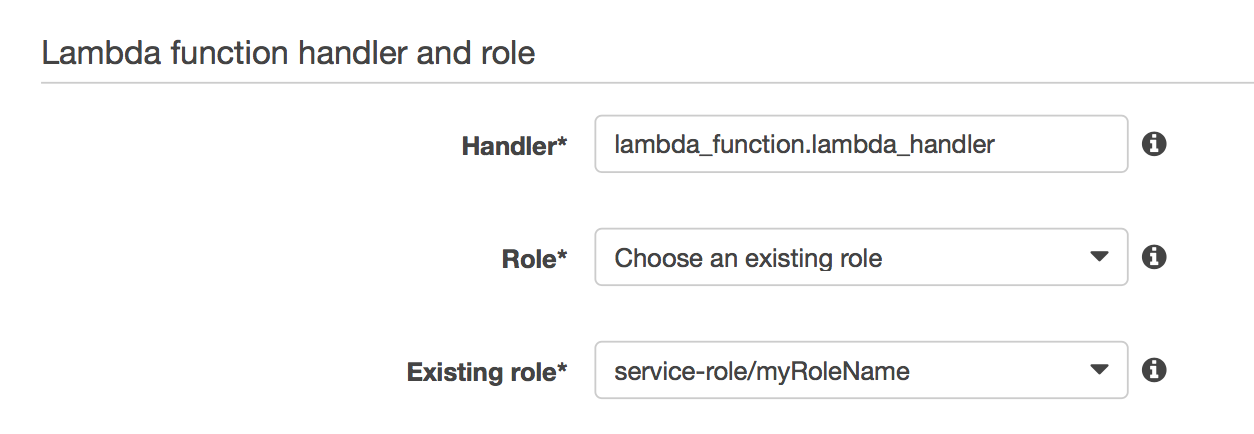
package has a function file named lambda_function.py so that it matches
the handler specification in the AWS console by default (i.e. The filename.handler-method
value in your function.). You could rename your .py file as anything, but remember to
update the handler specification to match.
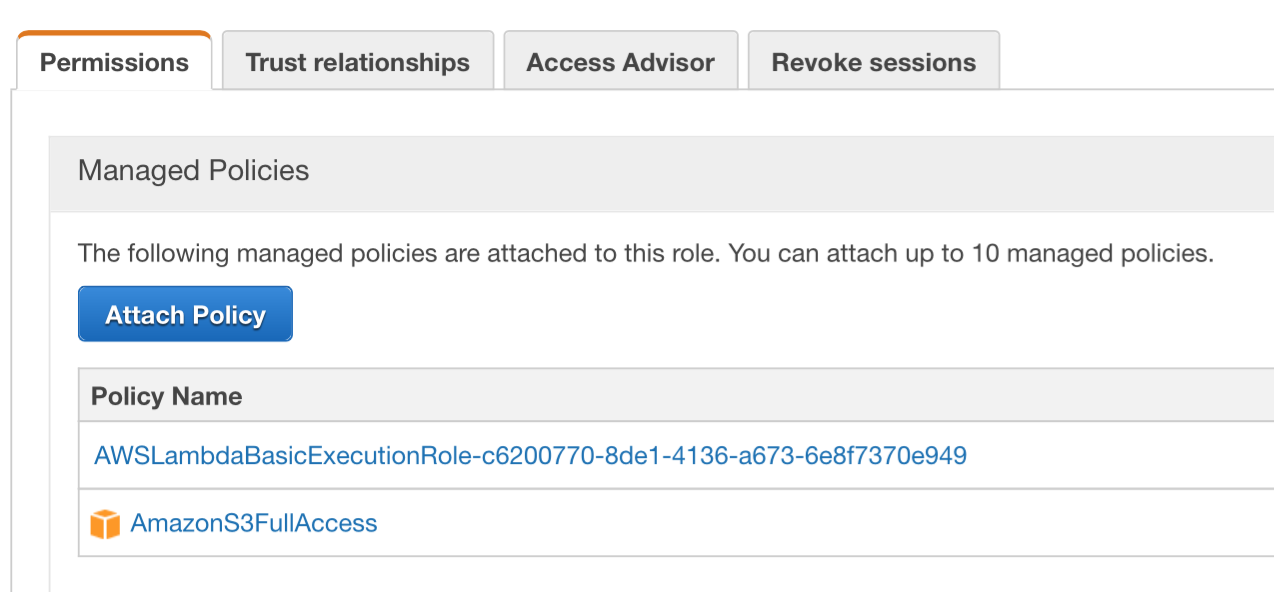
Finally, the Lambda function runs under an IAM service role. If you’d like the Lambda function to access other AWS resources, like reading your model file from S3, then you’ll want to make sure that the service role as permissions to access S3. For example, the image below shows the service role has access to write to CloudFront logs, but also full access to S3.
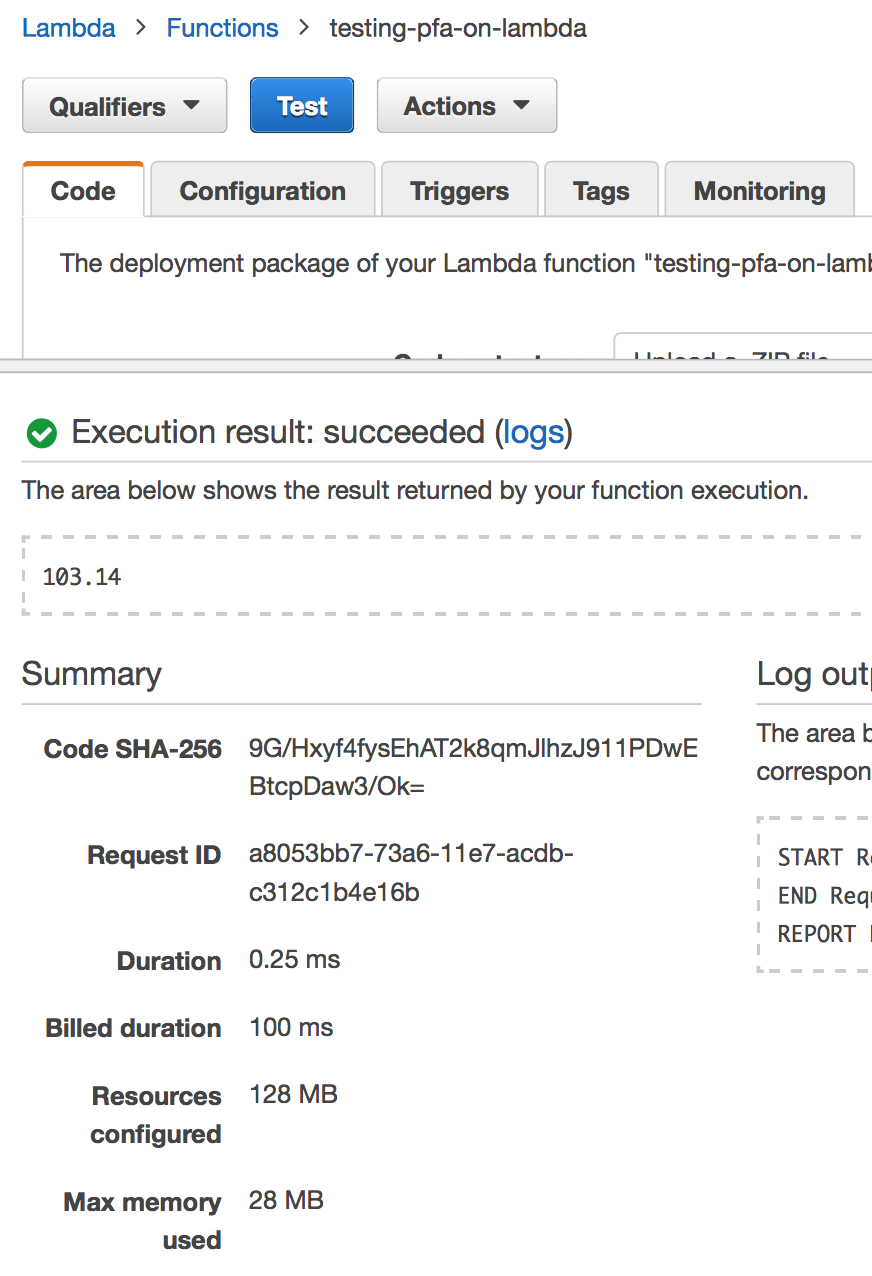
Proceed through the create Lambda function dialog to create your function, then give it a test. The function
lambda_function.py has hand-coded PFA logic to take 3.14 and add 100 to it, which returns 103.14.
In the test summary, you can see the output as 103.14, but you can also see that
the function executed in .25 milliseconds. A machine learning model executing in
.25 milliseconds is pretty darn fast and exciting to see, but this is just a toy example.
Step 2 - Build Your Model
A more realistic example, might be building a Naive Bayes classifier on a dataset of with
many predictors. The mlbench package has a dataset called “Sonar” that consists of
208 data points collected on 60 predictors. Our goal will be to predict two classes
(M for metal cylinder or R for rock). In the code below, I create a model and export
it to PFA using the aurelius package.
library(mlbench)
library(e1071)
data(Sonar)
set.seed(1)
sonar_model <- naiveBayes(Class ~ ., data=Sonar)

library(aurelius) # library for converting to PFA
sonar_model_as_pfa <- pfa(sonar_model)
write_pfa(sonar_model_as_pfa, '~/model.pfa')
Note that the model could be created in scikit-learn, MLlib or any number of R packages for maching learning and translated using a PFA converter library. Support exists for the JVM, Python, and R, just check here.
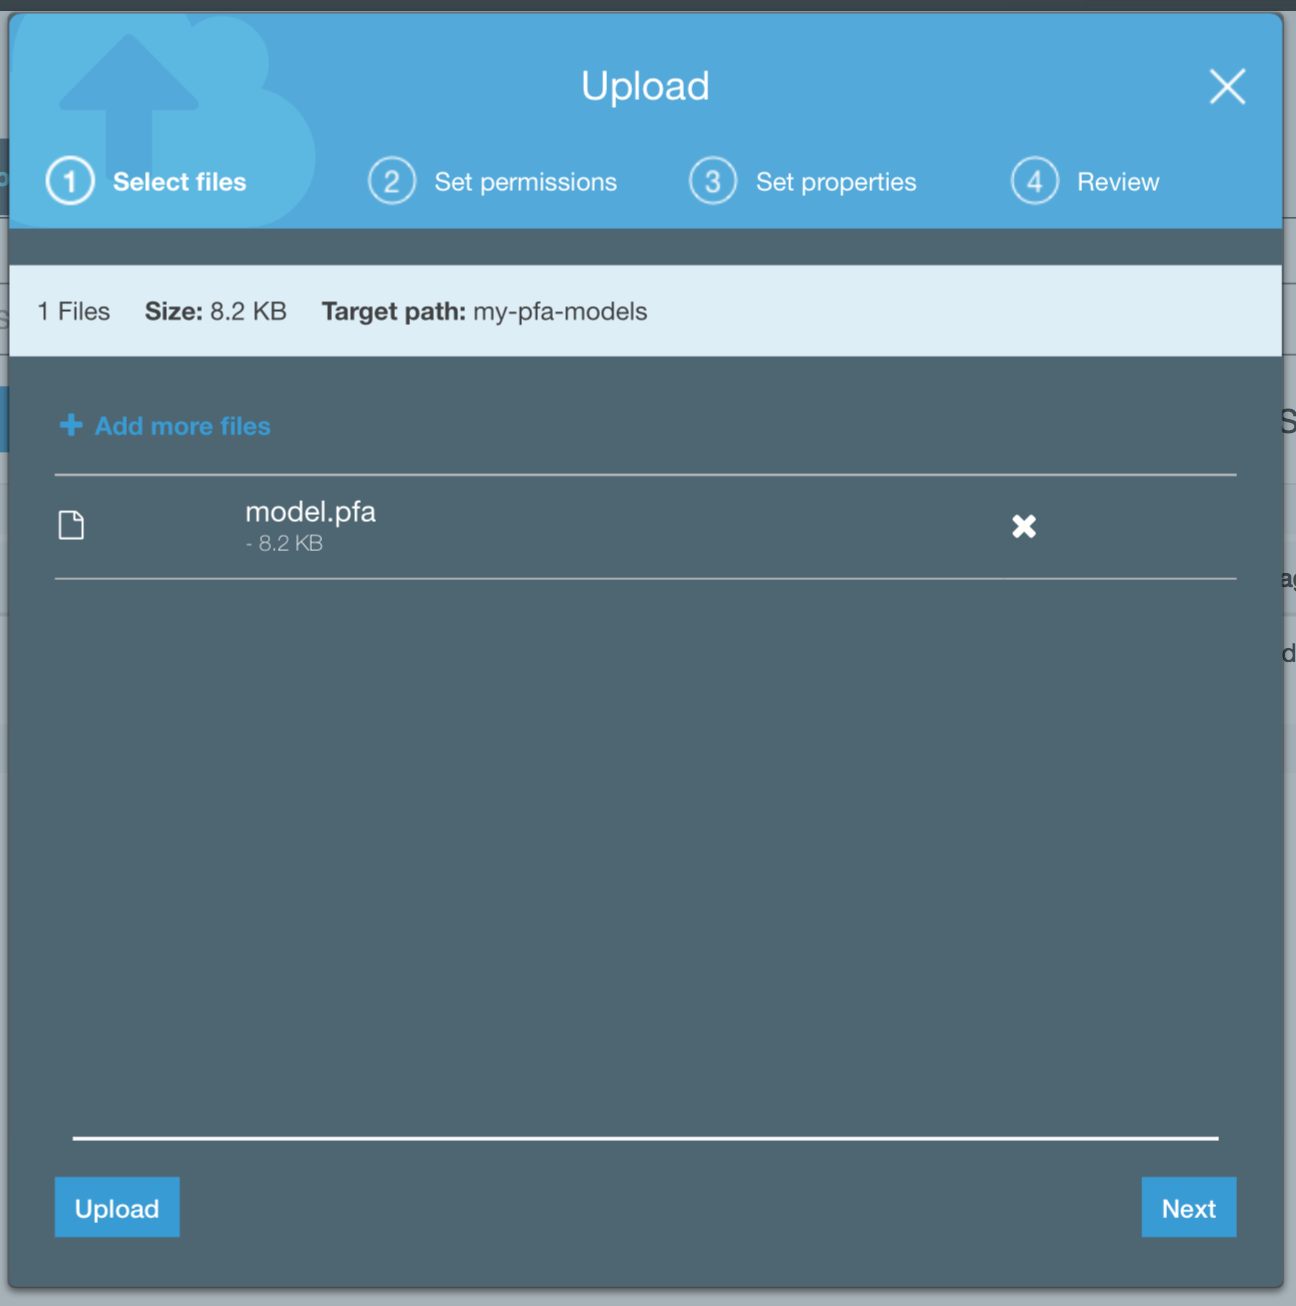
Step 3 - Upload Your Model to S3
After you’ve created a PFA model upload it to an S3 bucket. In the Lambda deploy package
there is a Lambda function called model-from-s3.py that has logic to read a PFA model
from an S3 bucket and use it for scoring.
Note, you may have to adjust the bucket name and model file name in the Python script to read the file you’ve uploaded. These parameters are specified in Lines 10 and 11 in the script.
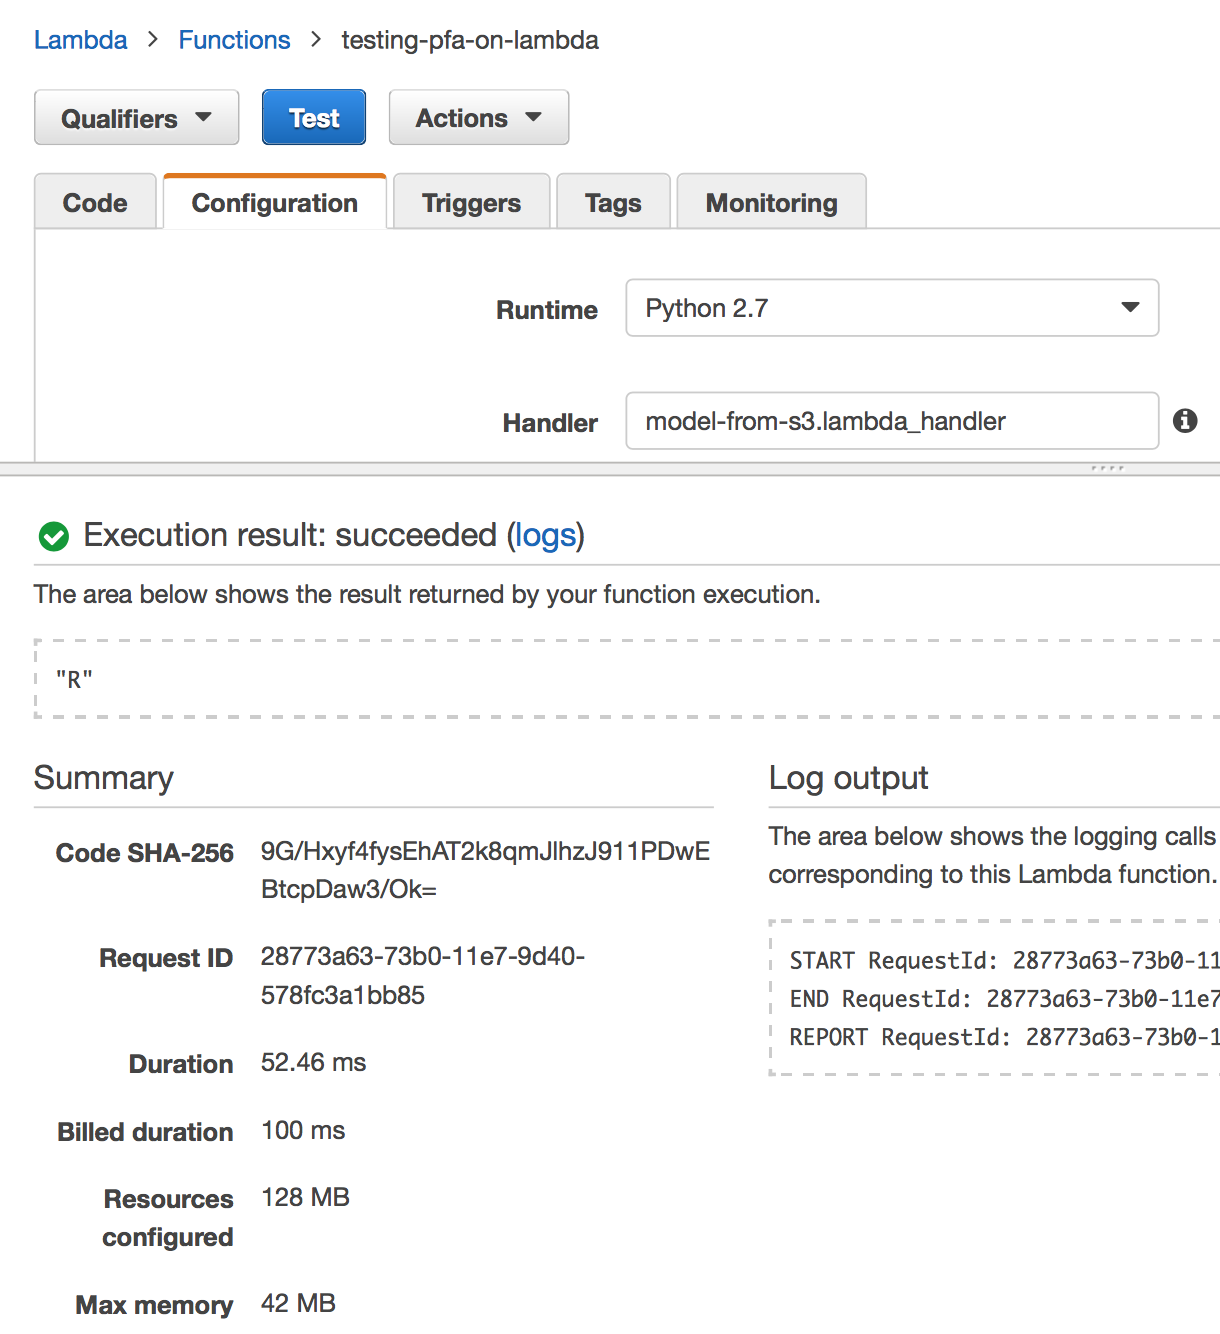
Step 4 - Test Your Lambda Makes Predictions
After configuring the script model-from-s3.py and re-uploading your Lambda deploy package,
you will need to update the handler specification in the AWS console. Change the value
to be model-from-s3.lambda_handler. This model requires the data to be provided
via the event JSON for the function. You can use the AWS Hello World testing template
which provides 3 dummy key-value pairs. Our model had 60 variables as inputs so instead of
writing those out by hand, it’s easiest to pull out one record from the sample data and
copy/paste into the testing template.
jsonlite::toJSON(jsonlite::unbox(Sonar[1,grepl('V[0-9]+', names(Sonar))]))## {"V1":0.02,"V2":0.0371,"V3":0.0428,"V4":0.0207,"V5":0.0954,"V6":0.0986,"V7":0.1539,"V8":0.1601,"V9":0.3109,"V10":0.2111,"V11":0.1609,"V12":0.1582,"V13":0.2238,"V14":0.0645,"V15":0.066,"V16":0.2273,"V17":0.31,"V18":0.2999,"V19":0.5078,"V20":0.4797,"V21":0.5783,"V22":0.5071,"V23":0.4328,"V24":0.555,"V25":0.6711,"V26":0.6415,"V27":0.7104,"V28":0.808,"V29":0.6791,"V30":0.3857,"V31":0.1307,"V32":0.2604,"V33":0.5121,"V34":0.7547,"V35":0.8537,"V36":0.8507,"V37":0.6692,"V38":0.6097,"V39":0.4943,"V40":0.2744,"V41":0.051,"V42":0.2834,"V43":0.2825,"V44":0.4256,"V45":0.2641,"V46":0.1386,"V47":0.1051,"V48":0.1343,"V49":0.0383,"V50":0.0324,"V51":0.0232,"V52":0.0027,"V53":0.0065,"V54":0.0159,"V55":0.0072,"V56":0.0167,"V57":0.018,"V58":0.0084,"V59":0.009,"V60":0.0032}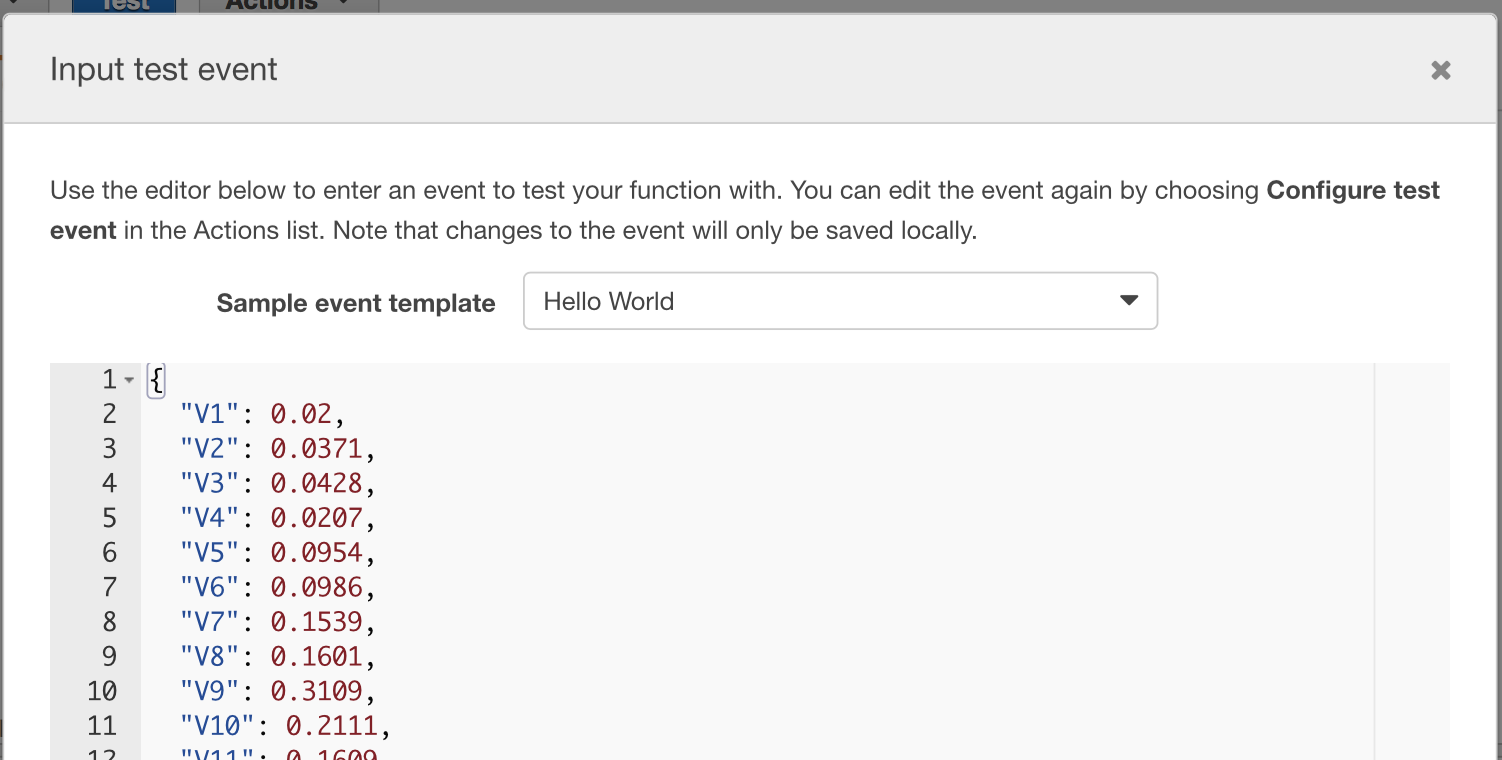
The results of a test on the real model are also encouraging. The prediction was
“R”, which matches the prediction of “R” using predict(sonar_model, Sonar[1,]).
Also, it only took 52.46 milliseconds to execute against a Naive Bayes model
model with 60 input variables. Note, different models will have different latencies,
so your performance may vary.
Step 5 - Hook Lambda Up to API Gateway
The last step in making your prediction service is to open it up as a webservice so that other applications can take advantage of your hard work. I won’t go into detail about API Gateway, but it’s very powerful in terms of supporting a full-fledged API (access keys, logging, documentation, etc.). I would encourage you to take advantage of these after getting the bare bones of your API working.
First, create an API and add a POST method. You’ll want to use a POST method because new data for your prediction will be POSTed in the request body as JSON. While setting up the method you can associate it to your Lambda function. You’ll be able to test that your API works by supplying some sample JSON in a format that your model expects.
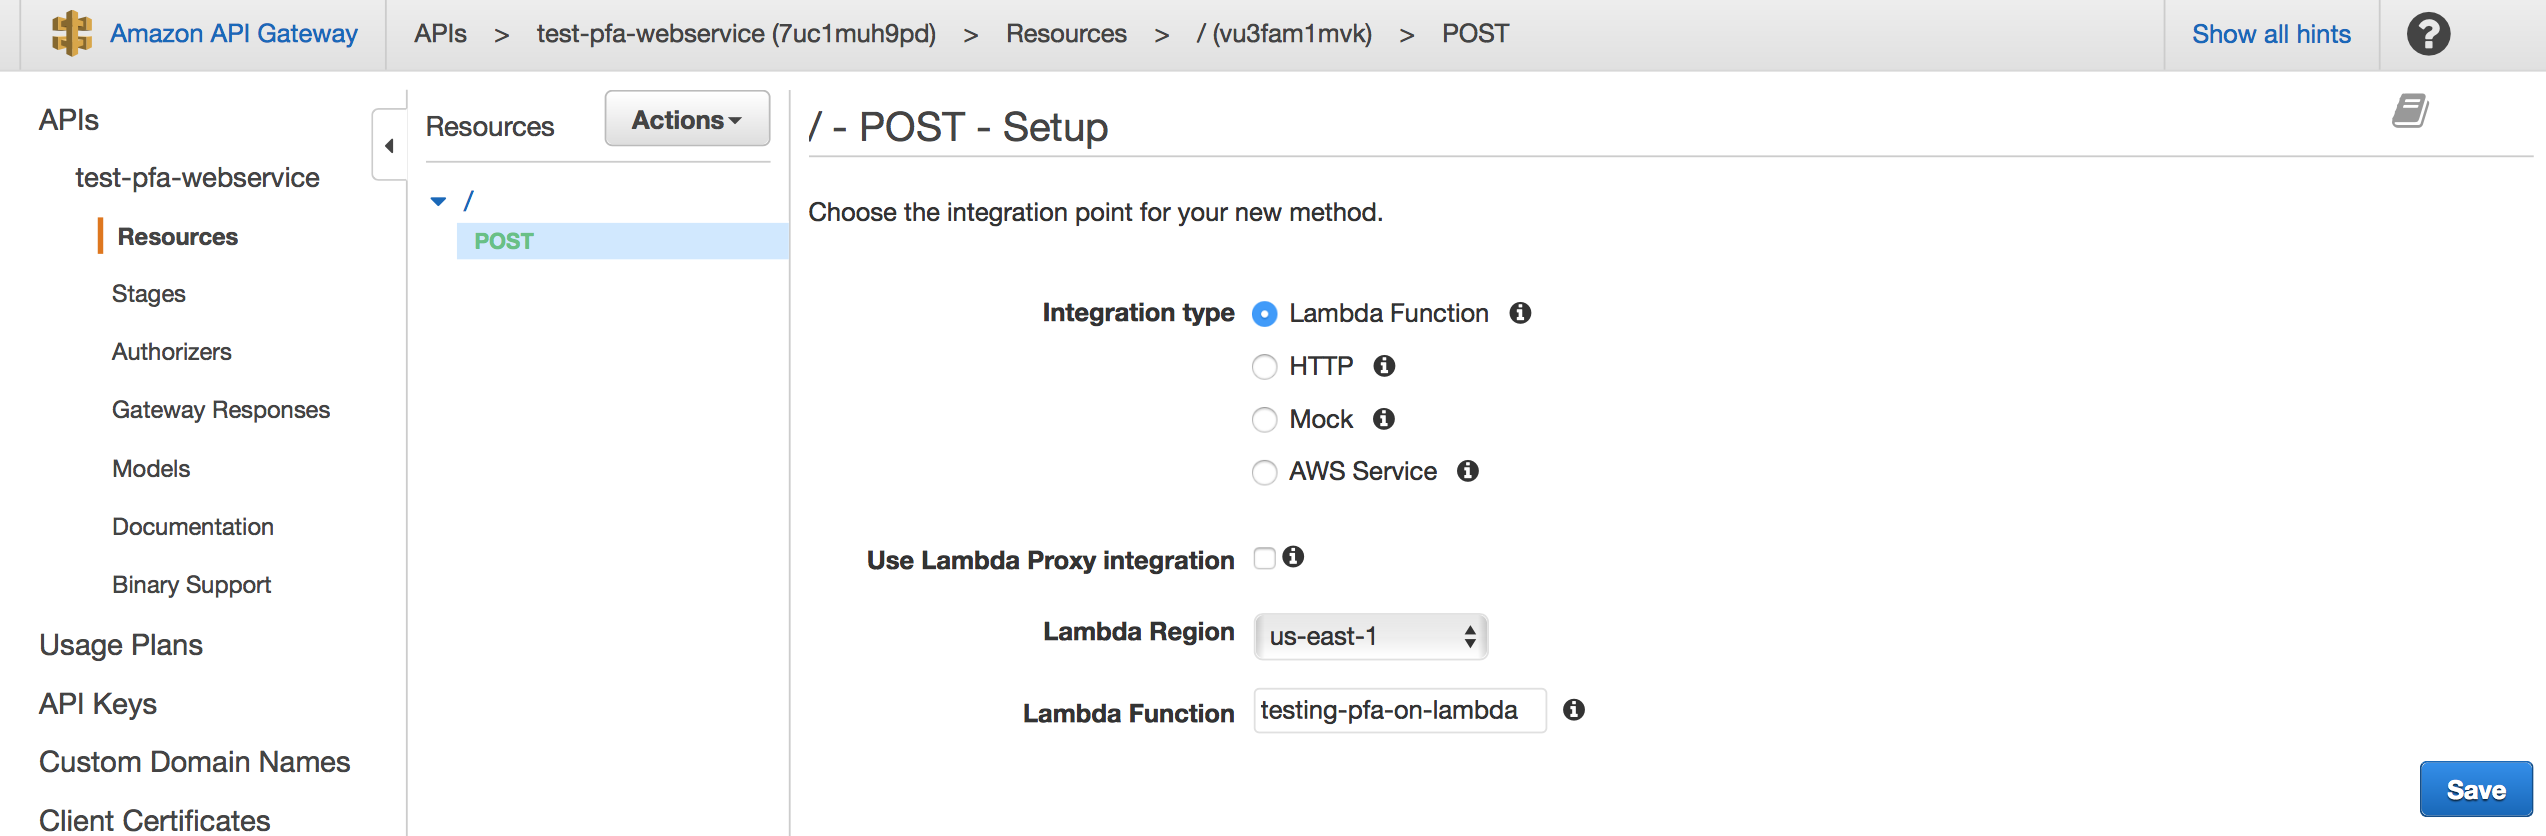
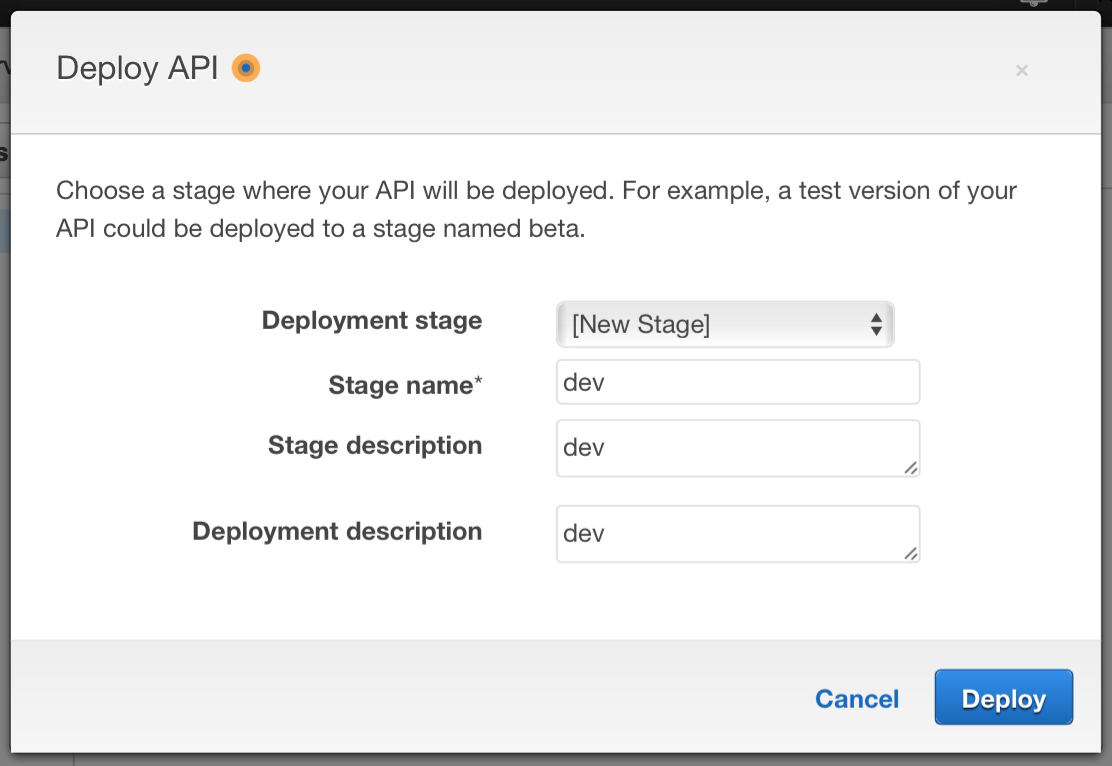
Finally, API Gateway requires you to “Deploy” your API so you’ll need to do that step before being able to access it via the web. APIs are deployed in stages, so you can create a stage called “dev” and deploy to it.
Now that everything is setup you can test calls against the invoke url by submitting
a curl command, like so:
curl -X POST -H "Content-Type: application/json" -d '{"V1":0.02,"V2":0.0371,"V3":0.0428,"V4":0.0207,"V5":0.0954,"V6":0.0986,"V7":0.1539,"V8":0.1601,"V9":0.3109,"V10":0.2111,"V11":0.1609,"V12":0.1582,"V13":0.2238,"V14":0.0645,"V15":0.066,"V16":0.2273,"V17":0.31,"V18":0.2999,"V19":0.5078,"V20":0.4797,"V21":0.5783,"V22":0.5071,"V23":0.4328,"V24":0.555,"V25":0.6711,"V26":0.6415,"V27":0.7104,"V28":0.808,"V29":0.6791,"V30":0.3857,"V31":0.1307,"V32":0.2604,"V33":0.5121,"V34":0.7547,"V35":0.8537,"V36":0.8507,"V37":0.6692,"V38":0.6097,"V39":0.4943,"V40":0.2744,"V41":0.051,"V42":0.2834,"V43":0.2825,"V44":0.4256,"V45":0.2641,"V46":0.1386,"V47":0.1051,"V48":0.1343,"V49":0.0383,"V50":0.0324,"V51":0.0232,"V52":0.0027,"V53":0.0065,"V54":0.0159,"V55":0.0072,"V56":0.0167,"V57":0.018,"V58":0.0084,"V59":0.009,"V60":0.0032}' https://7uc1muh9pd.execute-api.us-east-1.amazonaws.com/devLoad Testing
For those of you who are interested in the scalability. I used artillery.io to load test and got the following results for our classifier. I created a test where the load simulated 10 requests per second over 60 seconds. The 99th percentile latency was 0.30 seconds and the median was 0.15 seconds. The complete results were:
Load Testing Results
all scenarios completed
Complete report @ 2017-07-28T16:53:05.387Z
  Scenarios launched:  600
  Scenarios completed: 600
  Requests completed:  600
  RPS sent: 9.93
  Request latency:
    min: 115.6
    max: 806.8
    median: 149.1
    p95: 217.3
    p99: 300.1
  Scenario duration:
    min: 116.6
    max: 807.8
    median: 150.5
    p95: 219.6
    p99: 301
  Scenario counts:
    0: 600 (100%)
  Codes:
    200: 600
Load Testing Config
Here is my testing config as artillery YAML file:
config:
  target: 'https://7uc1muh9pd.execute-api.us-east-1.amazonaws.com'
  phases:
    - duration: 60
      arrivalRate: 10
  defaults:
    headers:
      Content-Type: 'application/json'
  payload:
    path: "./test-data.csv"
    fields:
      - "V1"
      - "V2"
      - "V3"
      - "V4"
      - "V5"
      - "V6"
      - "V7"
      - "V8"
      - "V9"
      - "V10"
      - "V11"
      - "V12"
      - "V13"
      - "V14"
      - "V15"
      - "V16"
      - "V17"
      - "V18"
      - "V19"
      - "V20"
      - "V21"
      - "V22"
      - "V23"
      - "V24"
      - "V25"
      - "V26"
      - "V27"
      - "V28"
      - "V29"
      - "V30"
      - "V31"
      - "V32"
      - "V33"
      - "V34"
      - "V35"
      - "V36"
      - "V37"
      - "V38"
      - "V39"
      - "V40"
      - "V41"
      - "V42"
      - "V43"
      - "V44"
      - "V45"
      - "V46"
      - "V47"
      - "V48"
      - "V49"
      - "V50"
      - "V51"
      - "V52"
      - "V53"
      - "V54"
      - "V55"
      - "V56"
      - "V57"
      - "V58"
      - "V59"
      - "V60"

scenarios:
  - flow:
    - post:
        url: "/dev"