TL;DR: If you need sequential execution in GitHub Actions consider these solutions:
Sequential steps: Steps within a job are always executed sequentially!
Sequential jobs: Set
max-parallel: 1within thejobs.strategyelement of the workflow.Sequential workflows: Use a
repository_dispatchAPI call at the end of the workflow to trigger the next workflow (code available in the An Example section below).
The issue
Ever since the generally available release of GitHub Actions in November (2019), it seems like many R packages developed on GitHub have switched from Travis CI or another continuous integration service to now using GitHub Actions (GHA). It seems like a great service to have integrated as closely as possible to your codebase, but the product is still under active development. There is a dedicated tag in the GitHub Support Community to ask questions and browse answers. However, in a few different questions (here, here, and here) it seems like folks are still grappling with GitHub’s design decision to execute all workflows and jobs in a repository in parallel, myself included.
As background, it is important to note here the basic lingo of GitHub Actions. A
repository can contain one or more ‘workflows’ defined by YAML files located in
the .github/workflows folder in the top level of the repository. Each
‘workflow’ can contain one or more ‘jobs’ that execute a series of ‘steps’.
By default, all steps in a single job execute sequentially. If you’re trying to
limit the number of parallel ‘jobs’ then you you can set a limit of 1 for the
workflow by setting max-parallel: 1 within the jobs.strategy
element of the workflow YAML. However, the issue with multiple jobs in a single
workflow is that if one job fails out of 10 jobs in your workflow, then
you’ll have to re-run all 10 jobs for the workflow status to be a success. For
this reason, I have decided to split jobs across different workflows. This way,
I can re-run one individually, if needed. I will refer to ‘jobs’ and
‘workflows’ interchangeably throughout this article because you can have workflows
that execute one job and one job only.
Why do I need sequential workflows/jobs?
The reason I need this functionality is that my workflows interact with a 3rd-party service (Salesforce) and one workflow might affect the results of another workflow if accessing the service simultaneously. I also want to prevent other workflows from executing if I can’t get the first one to succeed since the issue could occur across all workflows. This allows me to reduce the total number of API calls to Salesforce which are capped in a 24-hour period by catching issues early before other workflows execute.
An Example
You can setup sequential workflows using a repository_dispatch action in 4
easy steps:
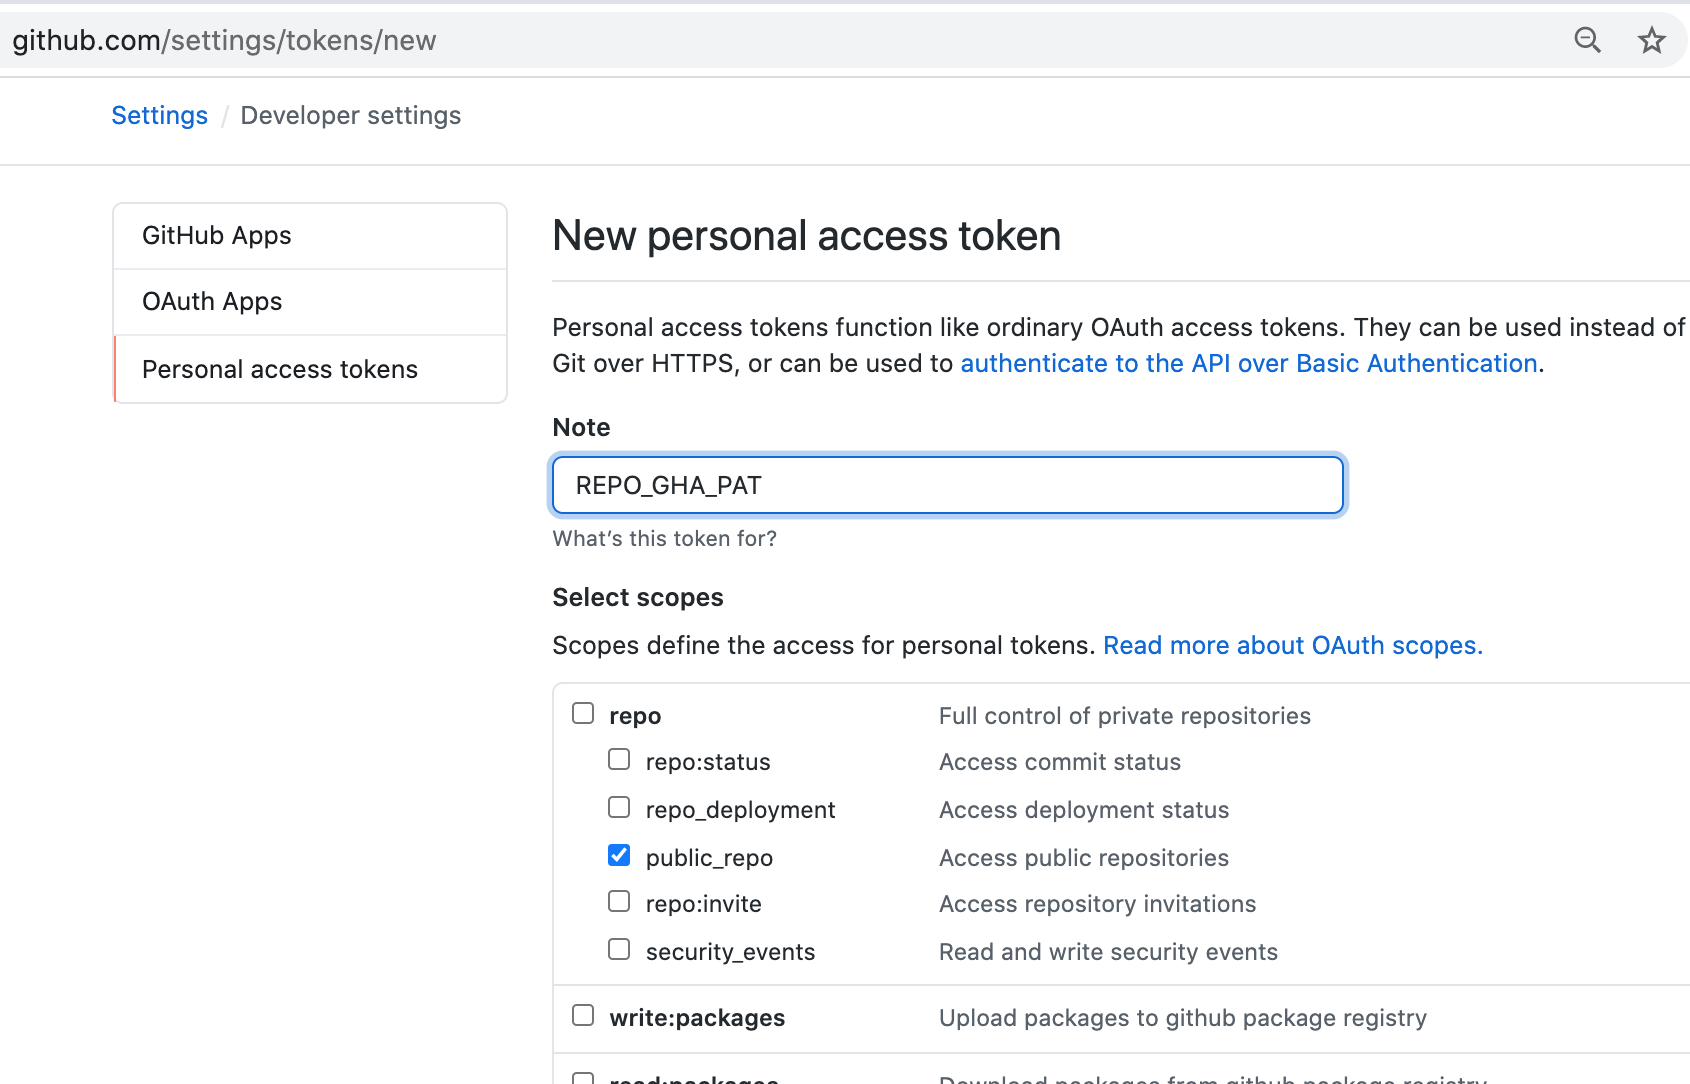
- Step 1 - Create a Personal Access Token (PAT)
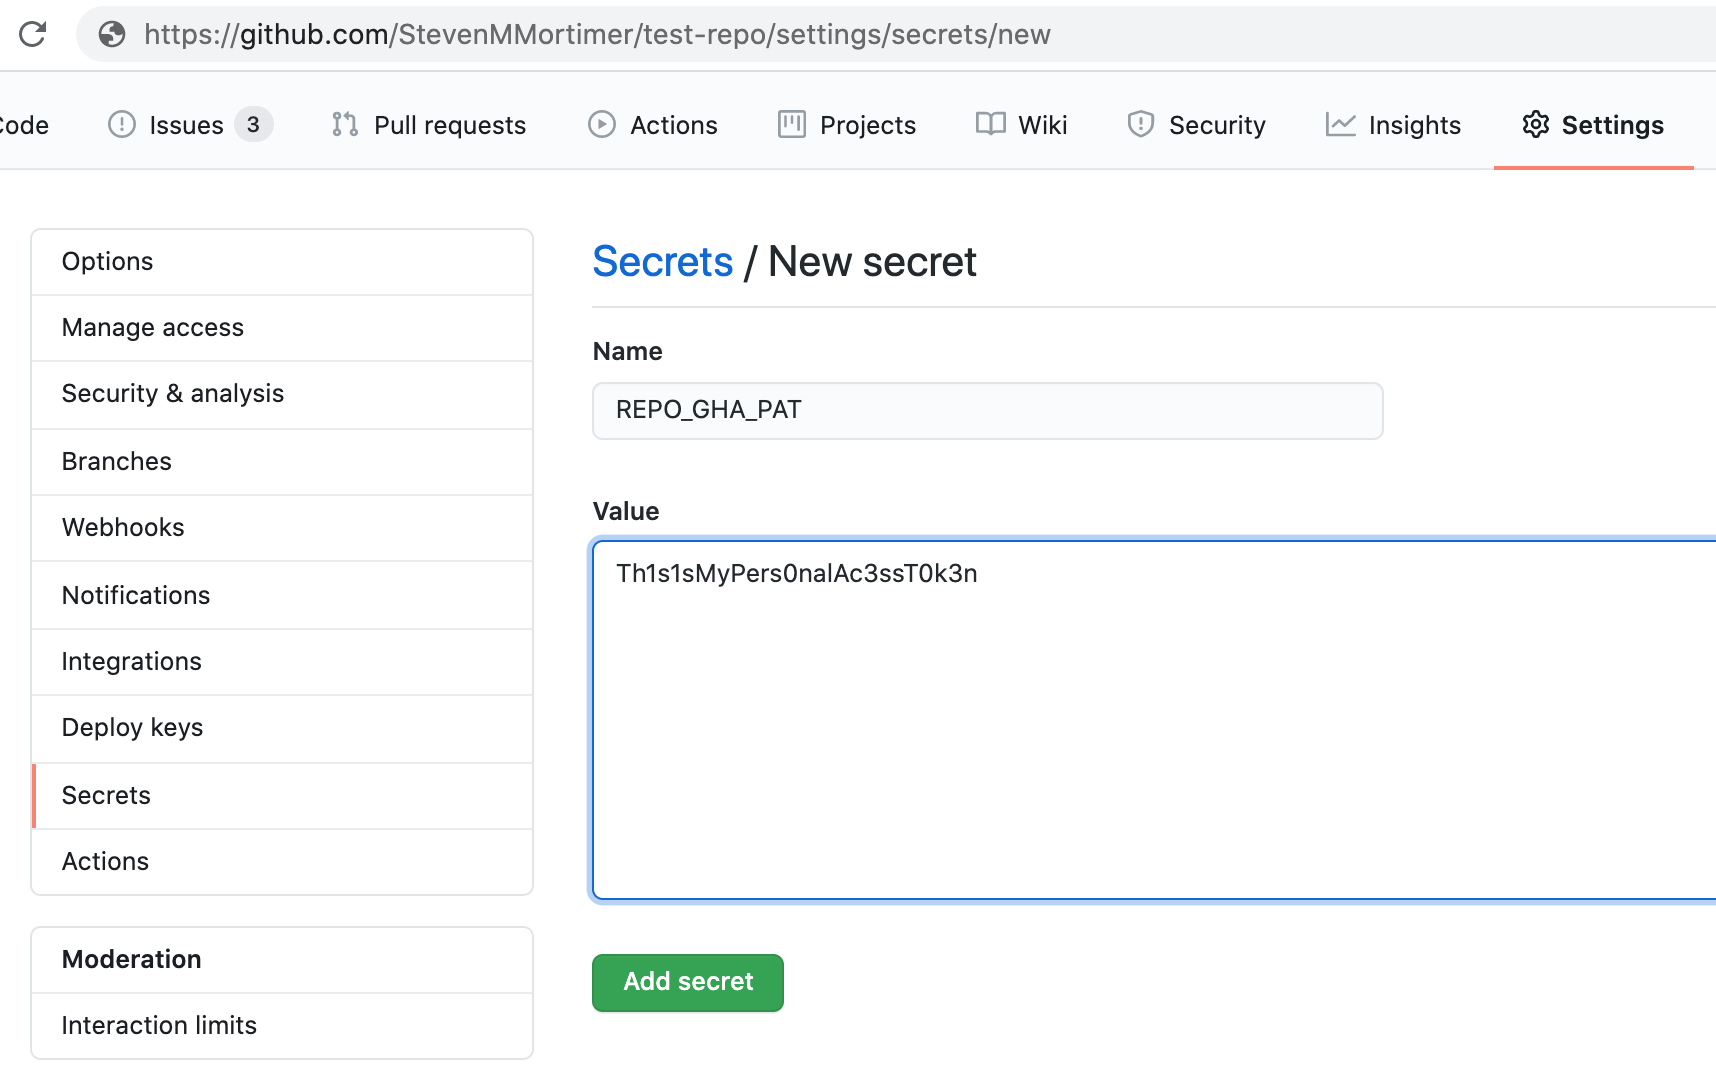
- Step 2 - Add the PAT as an actions secret in the repository
- Step 3 - Add the repository_dispatch event to Workflow 1
- Step 4 - Add the repository_dispatch event as trigger in Workflow 2 YAML
For context, a required element in every workflow the name of the
GitHub event that triggers the workflow. For example, on: pull_request means
“execute this workflow every time a pull request is opened”. If you want to run
workflows sequentially, then you just need to issue a specific event type that
lets the next workflow know when to begin. You could try to write your own solution
that uses the GitHub Actions APIs to list the workflows, jobs, or check-suites
and find out which ones have failed or not, but the easy alternative is to use a
repository_dispatch event.
“You can use this endpoint to trigger a webhook event called repository_dispatch when you want activity that happens outside of GitHub to trigger a GitHub Actions workflow or GitHub App webhook.”
https://developer.github.com/v3/repos/#create-a-repository-dispatch-event
Workflows aren’t aware of other workflows, so this event webhook is perfect to trigger,
or “daisy-chain”, separate workflows. You could execute the event via a curl command
from the shell in a new job step, but I recommend using the Repository
Dispatch action that Peter Evans has released in the GitHub Marketplace,
which makes it dirt simple to execute a repository dispatch event from a workflow.
Step 1 - Create a Personal Access Token (PAT)
Follow GitHub’s instructions here and
when it comes time to select the scopes, or permissions, you’d like to grant the
token then check "repo" if you’re on a private repository or "public_repo" if
you’re on a public one.

Step 2 - Add the PAT as an actions secret in the repository
Follow GitHub’s instructions here. I recommend naming the secret REPO_GHA_PAT.

Step 3 - Add the repository_dispatch event to Workflow 1
This step is where you update Workflow 1’s YAML file. For this example, consider “Workflow 1” as the workflow, and the job(s) contained within it, as what you’d like to execute first. Think of “Workflow 2” as the workflow you’d like to execute after “Workflow 1”. Add the following as the last step in the workflow YAML file:
- name: Trigger next workflow
  if: success()
  uses: peter-evans/repository-dispatch@v1
  with:
    token: ${{ secrets.REPO_GHA_PAT }}
    repository: ${{ github.repository }}
    event-type: trigger-workflow-2
    client-payload: '{"ref": "${{ github.ref }}", "sha": "${{ github.sha }}"}'
In this example above, you’ll notice the line if: success(). This means that, only
if all the prior steps in the workflow were successful, we should run this step
that triggers Workflow 2. Also you should notice the line which passes data from
Workflow 1 to Workflow 2:
client-payload: '{"ref": "${{ github.ref }}", "sha": "${{ github.sha }}"}'In this case it is telling Workflow 2 the branch and commit hash to checkout and use so that we know Workflows 1 and 2 are using the same exact code. Remember, it’s possible that you have a couple different Workflow 1’s running because you’ve pushed code or triggered them in some way and you want to make sure each one triggers the same code in Workflow 2.
Step 4 - Add the repository_dispatch event as trigger in Workflow 2 YAML
This step is where you update Workflow 2’s YAML file. First, add your event name as
the type of repository dispatch that should trigger Workflow 2. This name
must match exactly as what you specified the event-type we covered in Step 3
(the last step of Workflow 1). In our case we called the event to trigger Workflow 2
as event-type: trigger-workflow-2. This could be called anything you wish. The
important part is using the same name in the types key of the Workflow 2 YAML
file. It should be included within square brackets and without quotes as shown below:
name: Workflow 2

on:
  repository_dispatch:
    types: [trigger-workflow-2]
Second, use the client payload data from the event to checkout the same code. You can so this by modifying the checkout step, usually one of the first step in your job.
    steps:
      - uses: actions/checkout@v2
        with:
          ref: ${{ github.event.client_payload.sha }}

      ... (other steps)

      - uses: r-lib/actions/setup-r@master

      - uses: r-lib/actions/setup-pandoc@master
That’s it! If you have more than 2 workflows, then simply add a unique trigger as the last step in each workflow that calls the next. For the first workflow, I typically trigger based on a push to a certain branch like this:
name: Workflow 1

on:
  push:
    branches: main
If you would like to see a complete example in action, then feel free to browse the
 .github/workflows folder
for the {salesforcer} package.
Considerations
If you need your jobs to execute sequentially but you want them to all still
run, even if some fail, then just change the if: statement mentioned above in Step 3
to if: always(). The only reason I did not do this is that even if the following
workflow is successful, it will get triggered again when we re-run the failed workflow,
which I didn’t want. In order to achieve that you may need to use some more
advanced tricks/hacks to only execute if the next workflow has the same sha
and the latest run does not have a ‘completed’ status.
Another consideration is the cost to execute GitHub actions in private repositories. It’s true that many projects will not likely need to enforce sequential workflows because the tests, examples, checks or dependencies do not affect other workflows. However, GitHub Actions is only free for public respositories. You may have private repositories and want to limit the amount of processing time so you can stay within the free tier (less than 2,000 minutes per month). Sequential execution can prevent all the workflows from executing if upstream workflows fail.
References
You may find the following resources helpful when setting up on your own repository: